Okay, here’s my attempt at a blog post about weather balloon tracking, written in a casual, first-person style, and following your specified format:
So, I got this crazy idea to track a weather balloon. I’d seen some cool videos online, and I thought, “Why not give it a shot?” It seemed like a fun weekend project, and, well, it kinda spiraled from there.
Getting Started
First thing I did was get a weather balloon, obviously. I grabbed one off some online shop. Next up, the payload. I couldn’t just send a balloon up there with nothing, right? It would be pointless. So, i needed some stuff to make this fun.
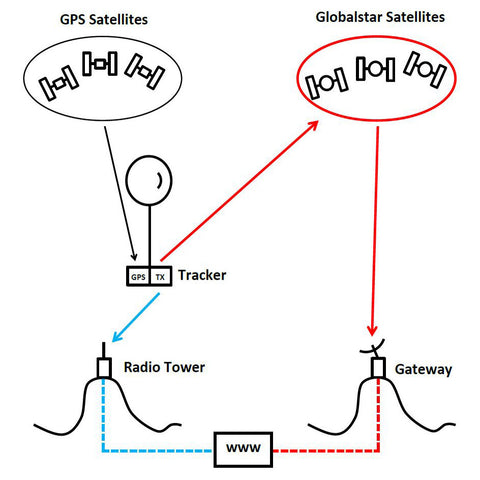
- GPS Tracker: This was key. I needed to know where the balloon was going! I found a cheap one, also online. I hoped it’s accurate.
- Camera: I wanted to see the pictures! I used an old action cam I had lying around. I taped up good.
- Batteries: Gotta power the whole thing. I used some power banks, made for charging phones. Figured they’d last long enough.
- Insulation: It gets cold up there, so I wrapped everything in some bubble wrap and foil. That might not be perfect but I was trying to be resourceful.
- Parachute:I used a small, brightly colored parachute.
The Build
Putting it all together was… interesting. I basically just taped everything inside a Styrofoam box. Seriously, lots and lots of tape. I cut a hole for the camera lens and made sure the GPS tracker had a clear view of the sky (I think?). I spent one whole afternoon on this. I think my cat judged me.
Launch Day!
I found a big, open field (with permission, of course) and filled the balloon with helium. That part was trickier than I expected, this is huge! I attached the payload box, said a little prayer, and let it go! It shot up pretty fast, which was both exciting and terrifying. It’s go time.
Tracking
This is where things got a little nerve-wracking. I was glued to my computer, watching the GPS tracker’s updates. For the first hour or so, it was amazing! I could see it climbing higher and higher, moving across the map. Then… the signal got spotty. And then… it stopped. Panic started to set in.
Recovery (Attempt)
The last known location was a good distance away, in some rural area. I hopped in my car and drove out there, hoping for the best. I spent hours searching, walking through fields, looking up at trees. It was like searching for a needle in a haystack, but bigger.
Sadly, I never found it. My awesome weather balloon payload is probably chilling in a farmer’s field somewhere, or maybe it became a bird’s nest. Who knows?
Lessons Learned
Even though I didn’t get my payload back, it was still a blast! I learned a lot, and I definitely want to try again. Here’s what I’d do differently next time:
- Better GPS Tracker: Spend a little more on a reliable tracker. I got what i paid for.
- Test Everything Thoroughly: I should have tested the whole setup more rigorously before launch. Maybe i would have found any weak point before send it to the sky.
- Lighter Payload: Maybe a smaller box would have helped.
- Brighter Colors: A more visible payload would make it easier to spot.
So, yeah, that was my weather balloon adventure. It was a bit of a fail, but a fun fail! I’m already planning my next attempt. Stay tuned!