Alright, let me tell you about my little adventure with helium for filling balloons. It sounds simple, right? Well, mostly it is, but there’s always a bit of a story when you do something for the first time in a while, or if you’re aiming for a specific outcome, like I was for my niece’s birthday party.

Getting Started – The Helium Quest
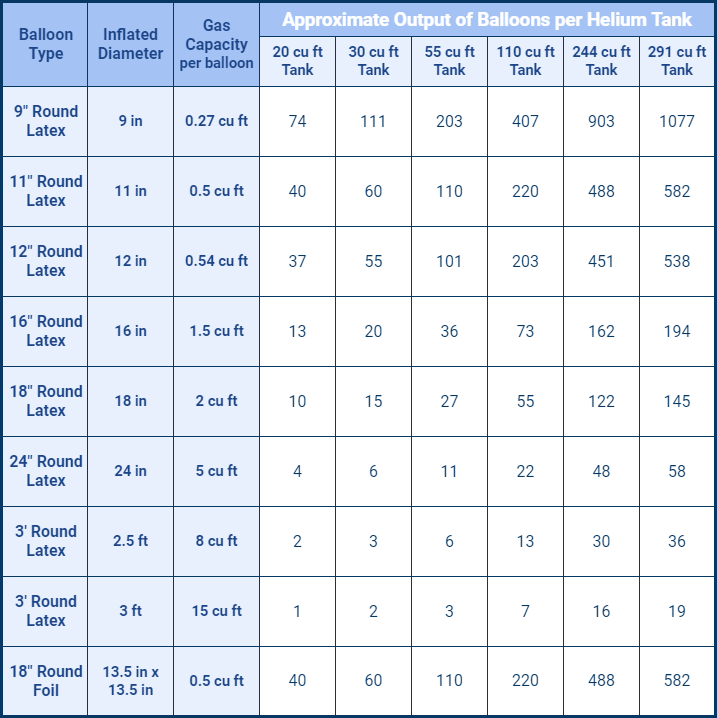
So, the party was coming up, and what’s a kid’s party without a bunch of floating balloons? My sister put me on balloon duty. First thing was figuring out where to even get helium. I remembered those disposable tanks from party stores, so I decided to go that route. Went down to the local shop, and there they were. Picked up one that said it could fill about 30 nine-inch balloons. Seemed about right for what we needed – not a massive hall, just a living room full of happy chaos.
Got the tank home. It wasn’t super heavy, but it had a bit of heft to it. The instructions on the box looked straightforward enough. Basically, attach the nozzle, turn the valve, and fill ‘er up. Famous last words, sometimes, eh?
The Main Event – Filling ‘Em Up
The evening before the party, I decided to tackle the balloons. Didn’t want to be rushing on the day itself. I laid out all the balloons – a nice mix of colors. Then I unboxed the tank. It came with a little black rubber nozzle.
Step 1: Attaching the Nozzle. This was pretty easy. Just screwed it onto the tank’s valve. Made sure it was snug but didn’t want to overtighten it and strip the threads or something. I’ve learned that lesson the hard way with other things around the house.
Step 2: The First Balloon. I grabbed a bright yellow balloon. Slipped the neck of the balloon over the nozzle. Now, the instructions said to bend the nozzle to release the helium. So, I held the balloon neck tight, took a breath, and gently bent the nozzle.
WHOOSH! That helium comes out faster than you think! My first balloon ended up a bit… overenthusiastic. It wasn’t huge, but it was very, very firm. I quickly stopped the flow. Lesson learned: gentle pressure on that nozzle.
Step 3: Getting the Hang of It. With the next balloon, a blue one, I was much more careful. A little bend, a little hiss, watch it grow. I aimed for that nice, round, floaty shape, not too tight. Once it was the right size, I pinched the neck, slipped it off the nozzle, and tied it off. Voila! One perfectly floating balloon. It’s surprisingly satisfying, I gotta say.
I got into a rhythm after that.
- Grab balloon.
- Stretch it a little (someone told me this helps, not sure if it’s true, but I did it).
- Slip onto nozzle.
- Gentle bend, fill.
- Pinch and tie.
I made sure to close the main valve on the tank between balloons, or at least every few balloons, just in case the nozzle had a slow leak. Didn’t want to waste any of that precious floaty gas.
One funny thing was the sound of my voice. You know how they say helium makes your voice squeaky? Well, even just being around it, with tiny bits escaping, I swore my voice went up a notch. Or maybe it was just the excitement of balloon inflation. Who knows?
The Aftermath and Some Thoughts
Took me about, oh, maybe 30-40 minutes to get through the batch. The tank did pretty much what it said on the tin, filled around 28 balloons to a good size before it started to peter out. The last couple were a bit sad and droopy, so I didn’t even bother trying to make them float.
Seeing all those balloons bobbing around the ceiling, ready for the party, was pretty cool. It’s a simple thing, helium balloons, but they really do add a lot of festive cheer. The kids, of course, went absolutely wild for them the next day. Mission accomplished.
It’s funny, you do these little tasks, and sometimes they make you think. Like, this tank of gas, it’s lighter than air, makes things float. Simple science, but still kind of magical when you see it in action. Makes you appreciate the little things that can bring a bit of joy. Anyway, that was my helium balloon adventure. Pretty straightforward, but like anything, it’s all in the doing of it.